
phpmyadmin is a opensource software tool written in PHP, intended to handle the administration of MySQL database over the Web. It supports a wide range of operations on MySQL and MariaDB. Frequently used operations such as managing databases, tables, columns, relations, indexes, users, permissions, etc. can be performed via the user friendly graphical interfaces, while you still have the ability to directly execute any SQL statement.
If you are looking to install phpmyadmin on a Ubuntu DigitalOcean Droplet with Nginx and Laravel, then in this article I’ll guide you step-by-step on how to install phpmyadmin with LEMP Stack.
Prerequisites
- You should have already setup LEMP Server Stack on Your Digital Ocean Droplet.
- Login to your terminal with a not-root user with sudo privileged, if you haven't one, Click here to create a Less privileged sudo user in your server.
Let's begin by updating our local package index so that we have access to the most recent package listings:
sudo apt update
Step 1. Install phpMyAdmin on Digital Ocean Droplet
sudo apt install phpmyadmin
When type the above command in your terminal, and it will begin to start download and install the phpMyAdmin, when it prompts to continue ? Press y and ENTER. During the installation process, you will be prompted with various configuration screens, Depending on your Server setup, the order of the configuration screen might be vary than mine.
Next you will be prompted to choose your web server like bellow: Nginx will most likely not be one of them, so that you have to skip by pressing TAB and then Enter to continue without selecting a Web Server.
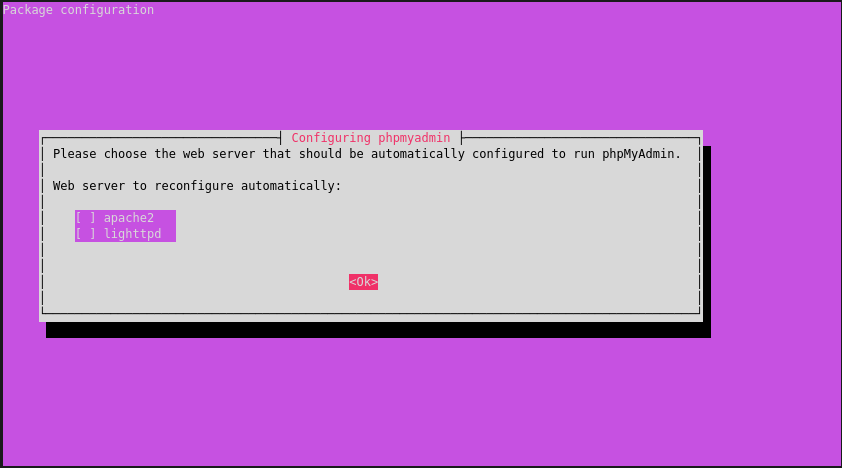
in the next screen, it will prompt whether you want to install and configure the database for phpMyAdmin, here you must select Yes and then press ENTER.

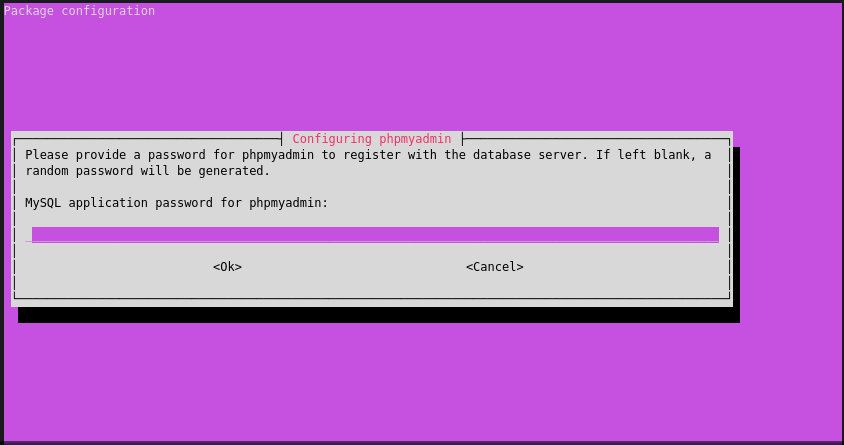
Next, the MySQL application password is only used internally by phpmyadmin to communicate with MySQL Server. You can leave this blank and a password will be generated automatically. Just press ENTER to continue.
And that’s it. Now we have installed the phpmyadmin on the server successfully.
Step 2. Configuring Nginx to serve phpmyadmin Over IP Address
There are multiple ways on how to setup the Nginx to serve phpmyadmin. We will configure the default server block file to use the server's IP address and serve the PHP requests then you can simply create a symbolic link from the phpmyadmin installation files to your default document root directory. Then you can access the phpmyadmin using http://youripaddress/phpmyadmin
Please complete all the steps mentioned in the Access Laravel Apps on Digitalocean using IP Address article and come back here. Please note down the new document root you define in the server block file following the article. ex: root /var/www/example/public;
In order for Nginx to serve the phpMyAdmin files correctly, we must create a symbolic link from the phpmyadmin directory /usr/share/phpmyadmin to the default document root directory you defined in the last step.
sudo ln -s /usr/share/phpmyadmin /var/www/example/public/phpmyadminStep3. Test phpmyadmin
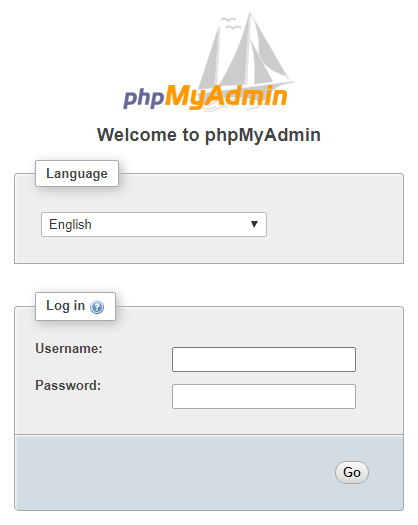
You should now be able to access the phpmyadmin web interface by visiting your server’s public IP address followed by /phpmyadmin. e.g. http://youripaddress/phpmyadmin, if everything went correct, you should see the login page similar to the following:
 If your attempt was not successful, here is another way to to configure nginx to serve phpmyadmin.
You should have noted the root username and password when installing MySQL for the first time or if you have followed my other article on how to setup LEMP Server Stack on Digital Ocean Droplet for Laravel . However, remote login might be disabled for root. If you get an error “Access denied for user ‘root’@’localhost'”, you should continue to Step 4 to create a new database user and grant full privileges to access and manage all database.
Step 4: Create MySQL User
Let's login to MySQL CLI with root user:
sudo mysql -u root -p
it might prompt for root password depending on if you have given a password or left it empty when you setup MySQL first time, when prompt for password, either enter the password or just press ENTER to continue if you didn't setup one:
Next run the following command in your terminal, make sure to replace the testuser and testpassword with your own.
CREATE USER 'testuser'@'localhost' IDENTIFIED BY 'testpassword';
Then we will grant the new user with full privilege to access all database on the server:
GRANT ALL PRIVILEGES ON *.* TO 'testuser'@'localhost' WITH GRANT OPTION;
Next we should flush and rebuilt the privilege:
FLUSH PRIVILEGES;
and if you want to create a database, run the following command with replacing the testdb with your own name:
CREATE DATABASE testdb;
You should now be able to access phpMyAdmin using this new user account, if everything went well, you should also see the sample database you just created.
Step 5: Obscure phpmyadmin URL
Internet Bots and those bad guys who called them selves as hacker are continuously scanning web servers for phpmyadmin, it is easy to find phpmyadmin login page since the standard URL scheme for phpmyadmin login page is something like this http://. youripaddress/phpmyadmin
It is possible to rename /phpmyadmin to /somethingelse , if you can remember In step 2, we created a symbolic link in the document root /var/www/example/public/phpmyadmin , we need to rename this symbolic link to something else, like ex: /titanicdb , Let's do it:
sudo mv /var/www/example/public/phpmyadmin /var/www/example/public/titanicdb
That is it, You should now be able to access phpMyAdmin at http://. You can rename it to any words as you prefer.youripaddress/titanicdb
If you have any other questions, experience or insights on "How to Install phpMyAdmin on Digital Ocean Droplet" please feel free to leave your thoughts in the comments bellow, Don't forget to share the posts.


Be the first one to write a response :(
{{ reply.member.name }} - {{ reply.created_at_human_readable }}