If you are going to develop a multi platform mobile application and you googled a bit probably you have met Ionic. Ionic is a complete framework based on AngularJS and Cordova to develop mobile application with a great interface and an excellent support for all the Cordova plugin like Camera and Social sharing.
Another excellent framework, and its not only made for mobile applications, is Meteor. From the release 1.2 it support native AngularJS as alternative to blaze frontend framework and it also support mobile deploy for IOs and Android like Ionic do.
Recently, on the github page of both framework, peoples was asking to create a plugin for Meteor to use Ionic in it. It was done… and now, we can build mobile application using the greatest features that both framework can offers, like realtime from Meteor and beautiful interface and effects from Ionic.
In this tutorial we will use both framework to create a simple photo sharing application where everyone can take a photo with its cellphone camera and post it with a message on a global realtime stream. The application will be very easy, without authentication and without security methods. Also the images will be stored directly into the mongo database and it’s for sure not good for a production app.
Start by creating a new meteor application
meteor create IonicMeteorPost
once the application is created we can start to load some plugin in it. Obiouvsly the first Meteor plugin we need to install is Ionic. Install it using the following commandmeteor add driftyco:ionic
As we said at begin Ionic is based on AngularJS so we need to install it
meteor add angular
The last thing in order to have the complete setup is to install the ngcordova angular module. The simplest method to load it is to use bower, but unfortunately Meteor itself don’t use it so we need to install and configure another Meteor module.
meteor add mquandalle:bower
Thanks to it now we can use bower in our Meteor application. To make it working we have t create a directory lib into the root folder of our project and place a bower.json file into it.
{
  "name": "ionicmeteorpost",
  "version": "0.0.1",
  "dependencies": {
    "ngCordova": "latest"
  },
  "private": true
}
now if you try to start Meteor you will see in the log the download of the ngCordova module.
Last thing before start writing some code si to give to our application a comprensive folders and file structure. As suggested in the angular-meteor tutorial best practice for large scale application is to maintain separated folder for each functionality.
Create a folder and file structure like show in the picture below :
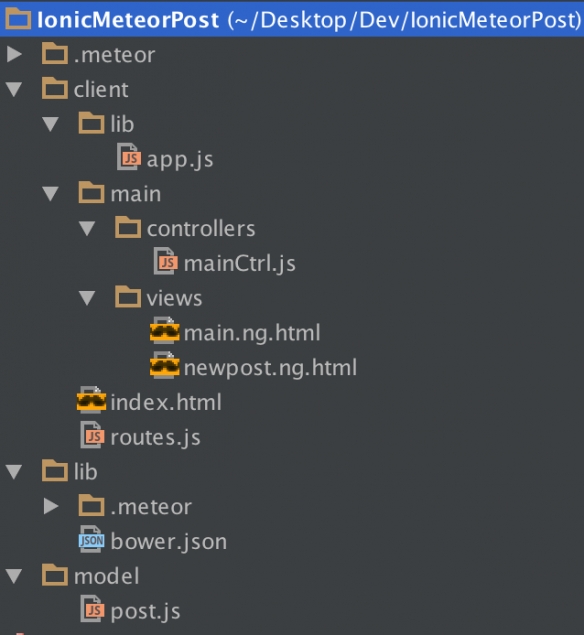
Basically we created four javascripts files (mainCtrl.js,routes.js,app.js,posts.js), two html files with .ng.html extension in order to avoid Meteor trying to compile it and the index.html file. Other files created by the standard application was deleted.
The first file we are going to edit is the simplest one. Put the code below into index.html
<head>
    <base href="/">
    <meta charset="utf-8">
    <meta name="viewport" content="initial-scale=1, maximum-scale=1, user-scalable=no, width=device-width">
    <title></title>
</head>


<body>
  <ion-nav-bar>
      <ion-nav-back-button class="button-clear">
          <i class="ion-arrow-left-c"></i> Back
      </ion-nav-back-button>
  </ion-nav-bar>
  <ion-nav-view>
  </ion-nav-view>
</body>
We just placed a navbar with a defined back button and a navigation view.
Now it’s time to start AngularJS application. We will place the basic code for the Angular module in the app.js file as show below
angular.module('starter', ['angular-meteor',
                            'ui.router',
                            'ionic',
                            'ngCordova'])


.run(function($ionicPlatform) {
    $ionicPlatform.ready(function() {
        if (window.cordova && window.cordova.plugins.Keyboard) {
            cordova.plugins.Keyboard.hideKeyboardAccessoryBar(true);
            cordova.plugins.Keyboard.disableScroll(true);

        }
        if (window.StatusBar) {
            // org.apache.cordova.statusbar required
            StatusBar.styleDefault();
        }
    });
});


function onReady() {
    angular.bootstrap(document, ['starter']);
}

if (Meteor.isCordova) {
    angular.element(document).on("deviceready", onReady);
}
else {
    angular.element(document).ready(onReady);
}
As you can see after initializing the application module we set some directive to make Ionic and Meteor working well on mobile devices and also started our Angular application on the Meteor deviceready event.
To get a taste of the Ionic application working together with Meteor we have to define a route and a basics Angular controller. Let’s start by editing the routes.js file.
angular.module("starter")
    .config(function($stateProvider, $urlRouterProvider) {
        $stateProvider
            .state('main', {
                url: '/main',
                templateUrl: 'client/main/views/main.ng.html',
                controller: 'MainCtrl'
            });

        $urlRouterProvider.otherwise('/main');
    });
then in the MainCtrl.js file place
angular.module("starter")
    .controller('MainCtrl', function($scope,$state,$stateParams,$ionicModal,$meteor) {
    });
Last thing before starting the application is the main view
<ion-view view-title="Posts">
    <ion-nav-buttons side="secondary">
        <button class="button button-icon icon ion-plus-round" ng-click="openPost()">
        </button>
    </ion-nav-buttons>

    <ion-content >
        <h2>This is the main view</h2>
    </ion-content>
</ion-view>
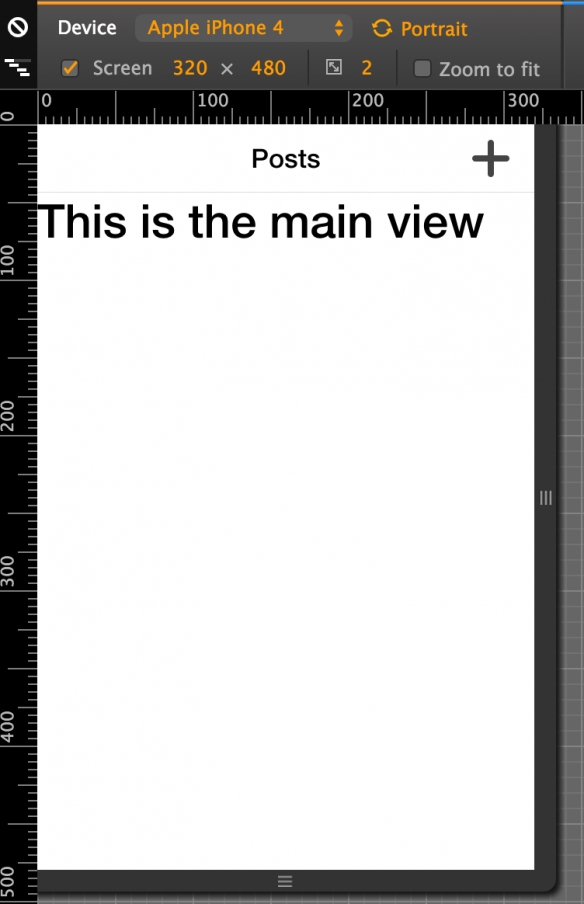
In the main view we already defined the navbar plus button to add posts in our application and a provisory title to see if the application till now was made well and run in the device.
At the moment you can test the application in the browser as we didn’t use any specific platform functionality like the Camera. The result will be something like shown in the screenshot below
Now that all piece are in place we can start some serious coding. First of all we want Meteor to publish a Posts collection and we want to link it to an array in the Angular application.
In the post.js file into the model folder add a single line of code to make the magic happen.
Posts = new Mongo.Collection("posts");In the mainCtrl.js file we want to bind this collection to an Angular array.
angular.module("starter")
    .controller('MainCtrl', function($scope,$state,$stateParams,$ionicModal,$meteor,$cordovaCamera) {
        $scope.posts = $meteor.collection(Posts);

        $scope.newPost={};

        $scope.post = function () {
            $scope.newPost.like=0;
            $scope.newPost.comments=[];
            $scope.posts.push( $scope.newPost);
            $scope.newPost={};
            $scope.closePost();

        };

        $scope.likePost= function(index){
            console.log( $scope.posts[index]);
            $scope.posts[index].like += 1;
        };

        $ionicModal.fromTemplateUrl('client/main/views/newpost.ng.html', {
            scope: $scope
        }).then(function(modal) {
            $scope.modal = modal;
        });

        $scope.closePost = function() {
            $scope.modal.hide();
        };

        $scope.openPost = function() {
            $scope.modal.show();
        };

    });
This code need a bit of explanation. In the first line, like said before we have bound the Meteor collection to the AngularJS array. Then we taken a step further declaring a function to insert new post into the collection and another to add a like to a post. Thanks to the 3-ways binding provided by Meteor no other instruction or server side code is needed to make the post update to all of the client using our application.
The last 3 function are relative to the $ionicModal window we need to initialize, show and close when we want to make a new post. The template for the modal is in the newpost.ng.html file and the code is reported below.
<ion-modal-view>
    <ion-header-bar>
        <h1 class="title">New Post</h1>
        <div class="buttons">
            <button class="button button-clear" ng-click="closePost()">Close</button>
        </div>
    </ion-header-bar>
    <ion-content>
        <div class="list">
            <div class="item item-body">
                <img id="myImage" class="full-image">
            </div>
            <button ng-click="getPhoto()" class="button button-block button-balanced">
                Add Photo
            </button>
            <label class="item item-input item-floating-label">
                <span class="input-label">Message</span>
                <input ng-model="newPost.message" type="text" placeholder="Message">
            </label>
            <button ng-disabled="!newPost.message" ng-click="post()" class="button button-block button-positive">
                Post
            </button>
        </div>
    </ion-content>
</ion-modal-view>
This a simple Ionic Html view where we used some Angular directive to make it a bit more functional and where we already defined a button to add a photo to our post.
Now that we have way to insert new post we can modify also the main view of the application where the added posts will be visible to all the user in realtime. Open the main.ng.html file and change the code to the one show below :
<ion-view view-title="Posts">
    <ion-nav-buttons side="secondary">
        <button class="button button-icon icon ion-plus-round" ng-click="openPost()">
        </button>
    </ion-nav-buttons>

    <ion-content >
        <div id="postlist">
            <div class="list card" ng-repeat="post in posts">

                <div class="item item-body">
                    <img ng-if="post.imageData" class="full-image" src="{{post.imageData}}">
                    <p>{{post.message}}
                    </p>
                    <p>
                        <a href="#" class="subdued">{{post.like}} Like</a>
                    </p>
                </div>

                <div class="item tabs tabs-secondary tabs-icon-left">
                    <a  ng-click="likePost($index)" class="tab-item" href="#">
                        <i class="icon ion-thumbsup"></i>
                        Like
                    </a>
                    <a class="tab-item" ng-click="share(post)" href="#">
                        <i class="icon ion-share"></i>
                        Share
                    </a>
                </div>
            </div>
        </div>
        <br>
    </ion-content>
</ion-view>
We added a list of posts. For each post in the list the user have a like button and the message displayed. There is also the image that is hided with a ng-if directive based on the presence of the imageData into the post record.
Now if you test the application using two or more browser windows you will see posted message and like given to a post coming in realtime on both windows. The result is show below.

Adding platform support
Ok now we have a stream with posts where user can put a like but we miss the most important thing, the photos. Unfortunately from now on all the test need to be made on the device simulator (you don’t need to restart it, it reload on changes like it did the browser ) so if you didn’t already made it, you have to add the sdk and the platform to the Meteor application.
meteor install sdk ios
meteor add-platform ios
meteor run ios
Once the simulator is started you can test the application using one desktop browser and a the simulator to see how it work well also on it.
The camera
Like anticipated at the beginning of the tutorial we will use a Cordova module to get control over the cellphone native caemra function. The first thing to make is to install the plugin using the Meteor CLI.
meteor add cordova:cordova-plugin-camera@1.2.0
Now the plugin is ready to be used. We will put the code to use it in the MainCtrl. Add the code below in that file
$scope.getPhoto = function(){

            var options = {
                quality: 50,
                destinationType: Camera.DestinationType.DATA_URL,
                sourceType: Camera.PictureSourceType.PHOTOLIBRARY,
                allowEdit: false,
                encodingType: Camera.EncodingType.JPEG,
                targetWidth: 500,
                targetHeight: 500,
                popoverOptions: CameraPopoverOptions,
                saveToPhotoAlbum: false,
                correctOrientation:true
            };

            $cordovaCamera.getPicture(options).then(function(imageData) {
                var image = document.getElementById('myImage');
                image.src = "data:image/jpeg;base64," + imageData;
                $scope.newPost.imageData=image.src;

            }, function(err) {
                // error
            });

        };
If you run the application in the simulator now you will be able to insert a picture into the post. For the testing purpose the camera sourceType is set to Camera.PictureSourceType.PHOTOLIBRARY otherwise you will get an error. To get more option about the camera plugin you can refer the original site here.

Conclusion
This is just the begin and the very basics on how to use this two, maybe three considering Cordova, framework toghether. We got the incredible realtime feature of Meteor joined with the awesome mobile interface offered by Ionic and we used just one of the hundreds plugins available in Cordova… can’t imagine what a developer can do with more of them…


Be the first one to write a response :(
{{ reply.member.name }} - {{ reply.created_at_human_readable }}