Upload files using Angular with Express
In this tutorial, I will be teaching on how to upload files in Angular 2+.
Throughout this tutorial, Angular means Angular version greater than 2.x unless stated otherwise.
In this tutorial, I will also help you all create a server script that handles the file uploads.
I will teach two methods of file uploads using Angular.
The first method entails using the ng2-file-upload package, while the second method is handling the uploads without using any third party package.
# What We Will Build
This is what the app will look like when we are done building.
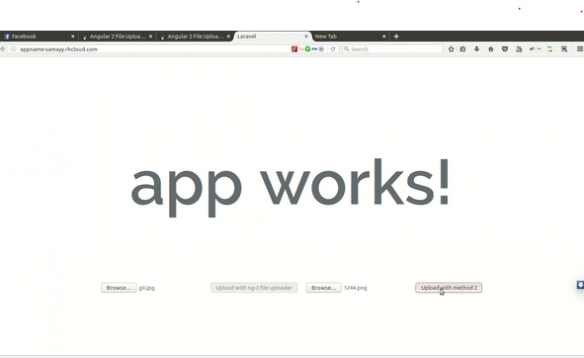
For the server side, we will be using Node.js (Express) for the script that handles the upload.
# Getting Started With Express Generator
To get started, we will need to install express generator, to take care of the configurations, and make our work much easier.
So we run this command.
sudo npm install -g express-generator
Once Express generator has been installed, its time to create our application.
So we run the following command.
express -e angular-file
After creating the application, we would need to move into the directory, and run npm install
cd angular-file
npm install
At this point, if we run ng start command, we should be able to see the default express page.
# Installing The Multer Library
The next step would be to install Multer. Multer is a package for handling file uploads in express js. To install Mutler, we run the following command.
npm install multer --save
At this point, we have multer installed, we would need to use it in the route handling our upload function.
# Setting Up The Upload Route
Let us open up our routes\index.js and replace it with the following:
//require express library
var express = require('express');
//require the express router
var router = express.Router();
//require multer for the file uploads
var multer = require('multer');
// set the directory for the uploads to the uploaded to
var DIR = './uploads/';
//define the type of upload multer would be doing and pass in its destination, in our case, its a single file with the name photo
var upload = multer({dest: DIR}).single('photo');
/* GET home page. */

router.get('/', function(req, res, next) {
// render the index page, and pass data to it.
  res.render('index', { title: 'Express' });
});

//our file upload function.
router.post('/', function (req, res, next) {
     var path = '';
     upload(req, res, function (err) {
        if (err) {
          // An error occurred when uploading
          console.log(err);
          return res.status(422).send("an Error occured")
        }
       // No error occured.
        path = req.file.path;
        return res.send("Upload Completed for "+path);
  });
})
module.exports = router;
In the above route file, we imported the mutler library, Created a variable DIR, that holds the destination point, we then define an upload varaible, that holds the mutler upload function telling it that it would be uploading a single file, with the name photo.
In our post route, we call the upload function, acting as a middleware, adding a callback, so we can know if the file was uploaded or not.
Once the file has been uploaded, mutler provides an interface for us to get the location of the file that has been uploaded, using the req.file.path, which we assign to a variable, and return it as the success message.
At this point, however, if we try to access the route from any client and upload files to it, it would give a cors origin blocked error, which of cause, is right, as we are going to be calling the upload api from another domain.
However, there's a fix for that.
# Creating The Cors Middleware
Locate your app.js file in the root folder, and lets locate the line that says app.use('/', routes) and just before that line, lets add the following:
//create a cors middleware
app.use(function(req, res, next) {
//set headers to allow cross origin request.
    res.header("Access-Control-Allow-Origin", "*");
    res.header('Access-Control-Allow-Methods', 'PUT, GET, POST, DELETE, OPTIONS');
    res.header("Access-Control-Allow-Headers", "Origin, X-Requested-With, Content-Type, Accept");
    next();
});
What we have done above, is to create a middleware, that adds the cors origin header ro the response, as well as allowed methods for that origin.
At this point, we can hit ctrl+c on the terminal, and then run npm start again to reload changes.
Our server Script is now ready to receive and upload files to our root upload folder.
# Getting Started With The Angular Cli
Now it's time we move to create the angular project that does the file upload.
let's move into the public folder, and we would use the angular-cli to create a new angular project
So we run the below command to install the angular-cli which is a Command Line Interface for developing Angular apps.
So in our terminal, we run the following command to install it and create a new project.
//install the angular-cli
npm install -g angular-cli

//change directory to the public folder of our working directory
cd public

//create a new angular project called testupload.
ng new testupload

//change directory to the test upload folder
cd testupload

//serve the angular application
ng serve
At this point, we see that npm packages are being installed, and as such, we wait till they are done.
Once they have been installed, we can run the ng serve to serve our application for us to see.
Extra Reading on Angular Cli Use the Angular CLI For Faster Angular 2 Projects
Now it's time to create the actual file upload.
# Using The Ng2-File-Upload Package
Method 1. Using the ng2-file-upload package.
Now after we have served the application, we would see a screen like this when we navigate to localhost:4200.

Now, lets run the following command to install the ng2-file-upload package.
//install the file upload plugin and save to composer.json file.
npm i ng2-file-upload --save
This installs the module into our node-modules folder, and as well saves it into our JSON file. Now lets head over to the file in src/app/app.component.ts
We would replace the contents of the file with this one below.
//import component and the oninit method from angular core
import { Component, OnInit } from '@angular/core';
//import the file uploader plugin
import {  FileUploader } from 'ng2-file-upload/ng2-file-upload';
//define the constant url we would be uploading to.
const URL = 'http://localhost:8000/api/upload';
//create the component properties
@Component({
    //define the element to be selected from the html structure.
    selector: 'app-root',
    //location of our template rather than writing in-line templates.
    templateUrl: './app.component.html',
    styleUrls: ['./app.component.css']
})
export class AppComponent implements OnInit {
    //declare a property called fileuploader and assign it to an instance of a new fileUploader.
    //pass in the Url to be uploaded to, and pass the itemAlais, which would be the name of the //file input when sending the post request.
    public uploader:FileUploader = new FileUploader({url: URL, itemAlias: 'photo'});
    //This is the default title property created by the angular cli. Its responsible for the app works
    title = 'app works!';

    ngOnInit() {
       //override the onAfterAddingfile property of the uploader so it doesn't authenticate with //credentials.
       this.uploader.onAfterAddingFile = (file)=> { file.withCredentials = false; };
       //overide the onCompleteItem property of the uploader so we are
       //able to deal with the server response.
       this.uploader.onCompleteItem = (item:any, response:any, status:any, headers:any) => {
            console.log("ImageUpload:uploaded:", item, status, response);
        };
    }
}
Here, we import component, alongside the OnInit class, so we can implement the ngOnInit function, which serve like a type of constructor for our component.
Then we import the file uploader class. We then define a constant that holds the url we are uploading to.
In our Appcomponent class, we define a public property called uploader, and assign it to an instance of the file uploader, passing along our URL and an extra itemAlais property which we would call the File Input.
The itemAlias property refers to the name we would like to call out file input.
Overiding The onAfterAddingFile Function
We then call the ngOnit function, where we override two of the uploaders function. The first function we override is the onAfterAddingFile function which is triggered after a file has been chosen, and we set the credentials to the file to be false. i.e we are not authenticating with credentials.
The next function we override is the onCompleteItem function. The reason we override this is so we can get the response from the server.
In our case, we just console log the status, response and the item.
Now we move into our html file and replace it with the following content, so we can add the input type.
<h1>
<!-- here we echo the title from the component -->
  {{title}}
</h1>

<!-- File input for the file-upload plugin, with special ng2-file-upload directive called ng2FileSelect -->
<input type="file" name="photo" ng2FileSelect [uploader]="uploader" />
<!-- button to trigger the file upload when submitted -->
<button type="button" class="btn btn-success btn-s" (click)="uploader.uploadAll()" [disabled]="!uploader.getNotUploadedItems().length">
      Upload with ng-2 file uploader
</button>
So we create an input of type file and we attach the ng2FileSelect directive to it, which makes it possible to bind the uploader attribute which it provide to our own uploader.
Then we create a button that is disabled if there is no item in the upload queue and has a click function to upload all files in the queue.
However, if we save our file at this time and run it, we would run into errors.
Including The Ng2FileSelect Directive
We would have to add a declaration to our app.module.ts, so we can use the ng2FileSelect directive.
So we add this line to the top of our app.module.ts
//import the ng2-file-upload directive so we can add it to our declarations.
import { FileSelectDirective } from 'ng2-file-upload';
And we also add the FileSelectDirective to our declarations
declarations: [
    AppComponent,
    FileSelectDirective
  ],
So our app.module.ts should look this way
import { BrowserModule } from '@angular/platform-browser';
import { NgModule } from '@angular/core';
import { FormsModule } from '@angular/forms';
import { HttpModule } from '@angular/http';
import { FileSelectDirective } from 'ng2-file-upload';
import { AppComponent } from './app.component';

@NgModule({
    declarations: [
        AppComponent,
        FileSelectDirective
    ],
    imports: [
        BrowserModule,
        FormsModule,
        HttpModule
    ],
  providers: [],
  bootstrap: [AppComponent]
})
export class AppModule { }
Now if we launch our application and upload, we should see that our file is sent to the server.
So on the Root folder, if we go to uploads folder, we should see that our images are being uploaded. Viola we just uploaded files using angular.
# Using The Underlying Form Data
However, there is a second method if we do not want to use the above plugin which requires using the underlying form-data to create the form data.
Let us create an extra file input and button in our app.component.html,
So our html structure looks this way.
<h1>
<!-- here we echo the title from the component -->
  {{title}}
</h1>

<!-- File input for the file-upload plugin, with special ng2-file-upload directive called ng2FileSelect -->
<input type="file" name="photo" ng2FileSelect [uploader]="uploader" />
<!-- button to trigger the file upload when submitted -->
<button type="button" class="btn btn-success btn-s" (click)="uploader.uploadAll()" [disabled]="!uploader.getNotUploadedItems().length">
    Upload with ng-2 file uploader
</button>

<!-- File input for upload without using the plugin. -->
<input id="photo" type="file" />
<!-- button to trigger the file upload when submitted -->
<button type="button" class="btn btn-success btn-s" (click)="upload()">
Upload with method 2
</button>
Note that i have added another file input with an id of photo, and another button which has a click event to upload.
Now let's create the upload function that handles the file upload.
Copy and replace your app component.ts with this.
//import component, ElementRef, input and the oninit method from angular core
import { Component, OnInit, ElementRef, Input } from '@angular/core';
//import the file-upload plugin
import {  FileUploader } from 'ng2-file-upload/ng2-file-upload';
//import the native angular http and respone libraries
import { Http, Response } from '@angular/http';
//import the do function to be used with the http library.
import "rxjs/add/operator/do";
//import the map function to be used with the http library
import "rxjs/add/operator/map";
const URL = 'http://localhost:8000/api/upload';

//create the component properties
@Component({
    //define the element to be selected from the html structure.
    selector: 'app-root',
    //location of our template rather than writing inline templates.
    templateUrl: './app.component.html',
    styleUrls: ['./app.component.css']
})
export class AppComponent implements OnInit {
     //declare a property called fileuploader and assign it to an instance of a new fileUploader.
    //pass in the Url to be uploaded to, and pass the itemAlais, which would be the name of the //file input when sending the post request.
    public uploader:FileUploader = new FileUploader({url: URL, itemAlias: 'photo'});
    //This is the default title property created by the angular cli. Its responsible for the app works
    title = 'app works!';

    ngOnInit() {
    //override the onAfterAddingfile property of the uploader so it doesn't authenticate with //credentials.
      this.uploader.onAfterAddingFile = (file)=> { file.withCredentials = false; };
    //overide the onCompleteItem property of the uploader so we are
    //able to deal with the server response.
      this.uploader.onCompleteItem = (item:any, response:any, status:any, headers:any) => {
            console.log("ImageUpload:uploaded:", item, status, response);
        };
    }
    //declare a constroctur, so we can pass in some properties to the class, which can be    //accessed using the this variable
    constructor(private http: Http, private el: ElementRef) {

    }
    //the function which handles the file upload without using a plugin.
    upload() {
    //locate the file element meant for the file upload.
        let inputEl: HTMLInputElement = this.el.nativeElement.querySelector('#photo');
    //get the total amount of files attached to the file input.
        let fileCount: number = inputEl.files.length;
    //create a new fromdata instance
        let formData = new FormData();
    //check if the filecount is greater than zero, to be sure a file was selected.
        if (fileCount > 0) { // a file was selected
            //append the key name 'photo' with the first file in the element
                formData.append('photo', inputEl.files.item(0));
            //call the angular http method
            this.http
        //post the form data to the url defined above and map the response. Then subscribe //to initiate the post. if you don't subscribe, angular wont post.
                .post(URL, formData).map((res:Response) => res.json()).subscribe(
                //map the success function and alert the response
                 (success) => {
                         alert(success._body);
                },
                (error) => alert(error))
          }
       }
}
What has changed?
In this updated version, i have imported element ref and input from angular core.
I also imported the HTTP and response from the angular HTTP library.
I also went ahead to import the map and do RX's functions to be used with our HTTP class.
In the app component class, two things were added. 1.) A constructor 2.) The upload function.
In the constructor, we pass in our HTTP and element ref instances, so they can be accessed by this.http and this.el.
The upload function here is where the work lies.
We declare inputel, which is of type htmlinputelement, and we set it to the instance of the file input we created with an id of photo using the nativelement.queryselector of the el.
We then declare a variable filecount of type number and set it to the length of the files in the inputelement.
We then use an if statement to be sure that a file was selected.
We then loop through the file and we append the first element of the file as the value of the key 'photo' which our server expects and then append to our formdata.
We then call our http library to post to our previously defined url, sending the formData as params.
At this point, if we try out our app and check the uploads folder, we should also see that the files are being uploaded.
# Conclusion
If you completed the above tutorial successfully, you have learned how to upload a file in Angular.
We have seen two different methods of uploading files. For those who do not like using third party libraries, we have used the underlying form data, and for those who do not mind to use plugins, we have used the ng2-file-upload plugin by valor.


Be the first one to write a response :(
{{ reply.member.name }} - {{ reply.created_at_human_readable }}