The ability to define macros for Eloquent relationships is a new feature in Laravel 5.4. It offers us the flexibility of fetching just a single instance of a hasMany() relationship by defining it in one place and then to utilize it for any related tables in the database with a one to many relationship.
As you might be aware, Eloquent is the name of a very simple, yet powerful and expressive ORM (object relational mapping) in Laravel. Getting started with Eloquent in Laravel requires creating a model which corresponds to and represent a particular table within the database.
This makes the process of defining relationships and retrieving related models very simple. Eloquent provides some very helpful ways of properly interacting with the tables in the database, thereby making it easy to carry out basic database operations, such as adding, deleting, updating and retrieving a specific record.
Which means you can simply create a function (Macro function) that will give you the possibility of chaining Eloquent relationship into one function and calling it anywhere within your application.
A Quick Example
With an Eloquent macro function, you can easily extend Laravel API for model (i.e Illuminate\Database\Eloquent\Model) with your own custom functions.
Take a look at this piece of code used to retrieve the last reply to a particular comment on a thread
// A particular comment Model
public function replies()
{
    return $this->hasMany(Reply::class);
}

public function latestReply()
{
    return $this->hasOne(Reply::class)->latest();
}
But assuming we have an Eloquent macro function (justHasOne) defined already within our application, we can simply do this
public function latestReply()
{
    // If macro justHasOne has been defined
    return $this->replies()->latest()->justHasOne();
}
With Eloquent macros, you can chain functions and greatly improve readability.
Let's quickly look into how seamless it is to create a macro function for Laravel Eloquent relationship. Just like this
HasMany::macro('toHasOne', function() {
     return new HasOne(
     $this->getQuery,
     $this->getParent,
     $this->foreignKey,
     $this->localKey
     );
});
Let's Begin
In this article I'll assume you are already conversant with the basics of Laravel i.e
- How to set up Laravel using composer
- If not, quickly go through this documentation
Setup Laravel
To get started, we need a fresh installation of Laravel. Ensure that your local development server meets the requirement for Laravel 5.4 as stated here. If you are set, let's quickly run the installation command using composer
# install laravel
composer create-project --prefer-dist laravel/laravel laravel-macro
And if you have Laravel installer installed on your computer, you can simply run the command below
laravel new laravel-macro
By now you should have Laravel setup and ready to go.
Demo project
This project is to get you started with Eloquent macros within Laravel application, so it's really going to be based on showcasing a very simple use case of this new feature. You can then build on this and use as you deem fit in your projects.
Use case
We will consider a very simple use case for this article. Let's assume that we intend to display the latest post by a particular user on a blog page (for example). We can simply define a HasOne relation in addition to HasMany relation with the posts model.
Migration
Since a fresh installation of Laravel comes with User model and migration file for user table out of the box, all we have to do right now is create a new model for Post.
# Create post model and migration file
php artisan make:model Post -m
Let us add more fields
- post field
- user_id
use Illuminate\Support\Facades\Schema;
use Illuminate\Database\Schema\Blueprint;
use Illuminate\Database\Migrations\Migration;

class CreatePostsTable extends Migration
{
    /**
     * Run the migrations.
     *
     * @return void
     */
    public function up()
    {
        Schema::create('posts', function (Blueprint $table) {
            $table->increments('id');
            /*add this*/
            $table->string('post');
            $table->integer('user_id')->unsigned();
            $table->timestamps();
        });
    }

    /**
     * Reverse the migrations.
     *
     * @return void
     */
    public function down()
    {
        Schema::dropIfExists('posts');
    }
}
Now we are ready to migrate our file
php artisan migrate
Bootstrap Service
To register our macro function, it will be best to create a service provider for it. Service providers are central place to configure Laravel application.
We will create a service provider and call it MacroServiceProvider with the command below
php artisan make:provider MacroServiceProvider
This will create a new file called MacroServiceProvider within App\Providers directory.
namespace App\Providers;

use Illuminate\Support\ServiceProvider;

class MacroServiceProvider extends ServiceProvider
{
    /**
     * Bootstrap the application services.
     *
     * @return void
     */
    public function boot()
    {
        //
    }

    /**
     * Register the application services.
     *
     * @return void
     */
    public function register()
    {
        //
    }
}
The service provider file usually contains a register and a boot method. The boot method is where we will need to declare our macro function. It will be bootstraped once we start our Laravel application.
Let's edit the boot method
// MacroServiceProvider.php
namespace App\Providers;

use Illuminate\Database\Eloquent\Relations\HasMany;
use Illuminate\Database\Eloquent\Relations\HasOne;
use Illuminate\Support\ServiceProvider;

class MacroServiceProvider extends ServiceProvider
{
    public $foreignKey = 'user_id';

    public $localKey = 'id';

    /**
     * Bootstrap the application services.
     *
     * @return void
     */
    public function boot()
    {
        HasMany::macro('toHasOne', function(){
           return new HasOne(
               $this->getQuery(),
               $this->getParent(),
               $this->foreignKey,
               $this->localKey
           );
        });

    }

    /**
     * Register the application services.
     *
     * @return void
     */
    public function register()
    {
        //
    }
}
So, we basically defined a name for our Eloquent macro function as 'toHasOne' and also declared both the foreignKey and localKey in order to ensure the relationship between our models.
The Eloquent macro function accepts a name as its first argument and a closure as its second. This closure will be executed once we call the function from a model within our application.
P.S Don't forget to add this at the top of your file
use Illuminate\Database\Eloquent\Relations\HasMany;
use Illuminate\Database\Eloquent\Relations\HasOne;
The next step is to register the service provider we just created. All service providers are registered within config/app.php
'providers' => [
    /*
    * Package Service Providers...
    */

        App\Providers\MacroServiceProvider::class,
],
Back to the User model and to make use of the Eloquent macro function we just created.
namespace App;

use Illuminate\Notifications\Notifiable;
use Illuminate\Foundation\Auth\User as Authenticatable;

class User extends Authenticatable
{
    use Notifiable;

    /**
     * The attributes that are mass assignable.
     *
     * @var array
     */
    protected $fillable = [
        'name', 'email', 'password',
    ];

    /**
     * The attributes that should be hidden for arrays.
     *
     * @var array
     */
    protected $hidden = [
        'password', 'remember_token',
    ];

    public function posts() {
        return $this->hasMany(Post::class);
    }

    public function lastPost(){
        return $this->posts()->latest()->toHasOne();
    }
}
The newly created function lastPost() can now be used within our application. This will give us access to the last post by a user.
We will create a simple view to display the usage of the macro function within our demo project, but before that, it will make sense to have some contents in our database.
Let us quickly achieve this by inserting some dummy data via a shell command called "tinker". This is just a really quick way for you to interact with your application in the command line.
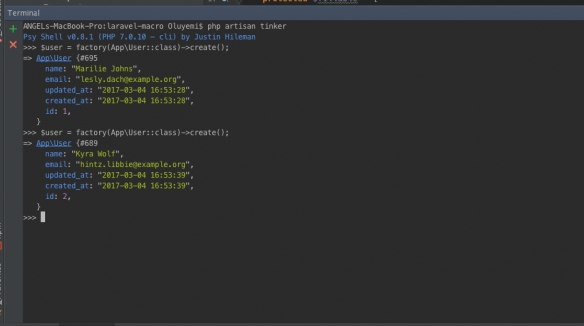
Inserting the data into the database using Tinker

Using the Eloquent macro function we created
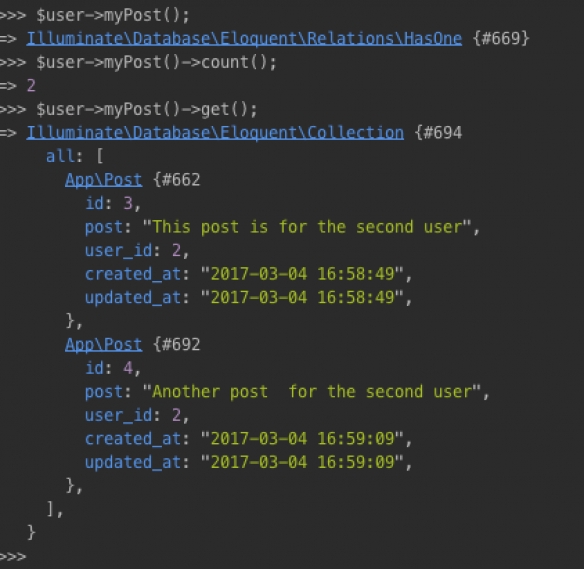
With the results above, it is obvious that a macro function comes handy when it comes to establishing relationships within models.
Alternatively, one can just create a database seeder file to input dummy data into the database as well.
Route
We are just going to make use of the existing route created by default and pass a new view to it.
use App\User;

Route::get('/', function () {
    return view('view_post')->with('users', User::all());
});
More Explanation
// User model
public function posts() {
        return $this->hasMany(Post::class);
    }

    public function lastPost(){
        return $this->posts()->latest()->toHasOne();
    }
So what does this have to do with relationship macro?
/* The functions below will give the same results */
// with macro function
 public function lastPost(){
        return $this->posts()->latest()->toHasOne();
    }

// without macro function
public function lastPost(){
        return $this->hasOne(Post::class)->latest();
    }
The answer is simple: instead of declaring a new one to one relationship specifically for fetching the last post (as stated in the second function above), the Eloquent macro function declared earlier has taking care of that.
Our View
Let's quickly create a simple view and pass our data into it.
<!-- resources/views/view_post.blade.php-->
<!DOCTYPE html>
<html lang="en">
<head>
    <meta charset="utf-8">
    <meta http-equiv="X-UA-Compatible" content="IE=edge">
    <meta name="viewport" content="width=device-width, initial-scale=1">

    <title> Eloquent Macros </title>

    <!-- Styles -->
    <link href="https://maxcdn.bootstrapcdn.com/bootstrap/3.3.7/css/bootstrap.min.css" rel="stylesheet">

    <style>
        body { padding-top:50px; } /* add some padding to the top of our site */
    </style>
</head>
<body>
<div class="container">
    <div class="form-group">
        @foreach($users as $user)
            <h2>{{ $user->name }}</h2>
            <p><small>{{ $user->email }}</small></p>
            <div class="well">
                <h4> Latest Post</h4>

                {{ $user->lastPost->post }}
            </div>
            <div>
                <h4>All Posts </h4>
                @foreach($user->posts as $post)
                    <h4> {{ $post->post }}</h4>
                    <small> Created at: {{ $post->created_at }}</small>
                    <small> Updated at: {{ $post->updated_at }}</small>
                @endforeach
            </div>
            <hr>
        @endforeach
    </div>
</div>
</body>
</html>
The use case for Eloquent macro function might be different in your application, but the concept is still the same.
# Conclusion
Eloquent macro functions focus on improving interaction with the database in Laravel applications and greatly enhance readability. As we saw in this tutorial, you can easily chain Eloquent relationships and fetch data from the database. This is designed to help you get a good grasp of how to use Eloquent macros in your own Laravel applications. You can leverage the knowledge gained here to build bigger, better and more functional apps. I hope you found this tutorial helpful. You can drop a comment, if you have suggestions or encounter any issues while going through the tutorial.


Be the first one to write a response :(
{{ reply.member.name }} - {{ reply.created_at_human_readable }}